forked from drowl87/hextra_mirror
164 lines
6.6 KiB
Markdown
164 lines
6.6 KiB
Markdown
|
|
---
|
|||
|
|
title: サイトのデプロイ
|
|||
|
|
prev: /docs/guide/shortcodes
|
|||
|
|
next: /docs/advanced
|
|||
|
|
---
|
|||
|
|
|
|||
|
|
Hugoは静的サイトを生成するため、柔軟なホスティングオプションが可能です。
|
|||
|
|
このページでは、Hextraサイトをさまざまなプラットフォームにデプロイするためのガイドを提供します。
|
|||
|
|
|
|||
|
|
<!--more-->
|
|||
|
|
|
|||
|
|
|
|||
|
|
## GitHub Pages
|
|||
|
|
|
|||
|
|
[GitHub Pages](https://docs.github.com/pages)は、無料でウェブサイトをデプロイおよびホストするための推奨方法です。
|
|||
|
|
|
|||
|
|
[hextra-starter-template](https://github.com/imfing/hextra-starter-template)を使用してサイトをブートストラップした場合、GitHub Pagesへの自動デプロイを支援するGitHub Actionsワークフローがすぐに利用可能です。
|
|||
|
|
|
|||
|
|
{{% details title="GitHub Actionsの設定" closed="true" %}}
|
|||
|
|
|
|||
|
|
以下は、[hextra-starter-template](https://github.com/imfing/hextra-starter-template)からの設定例です:
|
|||
|
|
|
|||
|
|
```yaml {filename=".github/workflows/pages.yaml"}
|
|||
|
|
# HugoサイトをGitHub Pagesにデプロイするためのサンプルワークフロー
|
|||
|
|
name: Deploy Hugo site to Pages
|
|||
|
|
|
|||
|
|
on:
|
|||
|
|
# デフォルトブランチへのプッシュ時に実行
|
|||
|
|
push:
|
|||
|
|
branches: ["main"]
|
|||
|
|
|
|||
|
|
# Actionsタブから手動でこのワークフローを実行可能
|
|||
|
|
workflow_dispatch:
|
|||
|
|
|
|||
|
|
# GITHUB_TOKENの権限を設定してGitHub Pagesへのデプロイを許可
|
|||
|
|
permissions:
|
|||
|
|
contents: read
|
|||
|
|
pages: write
|
|||
|
|
id-token: write
|
|||
|
|
|
|||
|
|
# 同時実行を1つに制限し、進行中の実行と最新のキューイングされた実行の間の実行をスキップ。
|
|||
|
|
# ただし、進行中の実行はキャンセルしないでください。これらの本番デプロイを完了させたいためです。
|
|||
|
|
concurrency:
|
|||
|
|
group: "pages"
|
|||
|
|
cancel-in-progress: false
|
|||
|
|
|
|||
|
|
# デフォルトはbash
|
|||
|
|
defaults:
|
|||
|
|
run:
|
|||
|
|
shell: bash
|
|||
|
|
|
|||
|
|
jobs:
|
|||
|
|
# ビルドジョブ
|
|||
|
|
build:
|
|||
|
|
runs-on: ubuntu-latest
|
|||
|
|
env:
|
|||
|
|
HUGO_VERSION: 0.138.0
|
|||
|
|
steps:
|
|||
|
|
- name: Checkout
|
|||
|
|
uses: actions/checkout@v4
|
|||
|
|
with:
|
|||
|
|
fetch-depth: 0 # .GitInfoと.Lastmodのためにすべての履歴を取得
|
|||
|
|
submodules: recursive
|
|||
|
|
- name: Setup Go
|
|||
|
|
uses: actions/setup-go@v5
|
|||
|
|
with:
|
|||
|
|
go-version: '1.22'
|
|||
|
|
- name: Setup Pages
|
|||
|
|
id: pages
|
|||
|
|
uses: actions/configure-pages@v4
|
|||
|
|
- name: Setup Hugo
|
|||
|
|
run: |
|
|||
|
|
wget -O ${{ runner.temp }}/hugo.deb https://github.com/gohugoio/hugo/releases/download/v${HUGO_VERSION}/hugo_extended_${HUGO_VERSION}_linux-amd64.deb \
|
|||
|
|
&& sudo dpkg -i ${{ runner.temp }}/hugo.deb
|
|||
|
|
- name: Build with Hugo
|
|||
|
|
env:
|
|||
|
|
# Hugoモジュールとの最大限の互換性のために
|
|||
|
|
HUGO_ENVIRONMENT: production
|
|||
|
|
HUGO_ENV: production
|
|||
|
|
run: |
|
|||
|
|
hugo \
|
|||
|
|
--gc --minify \
|
|||
|
|
--baseURL "${{ steps.pages.outputs.base_url }}/"
|
|||
|
|
- name: Upload artifact
|
|||
|
|
uses: actions/upload-pages-artifact@v3
|
|||
|
|
with:
|
|||
|
|
path: ./public
|
|||
|
|
|
|||
|
|
# デプロイジョブ
|
|||
|
|
deploy:
|
|||
|
|
environment:
|
|||
|
|
name: github-pages
|
|||
|
|
url: ${{ steps.deployment.outputs.page_url }}
|
|||
|
|
runs-on: ubuntu-latest
|
|||
|
|
needs: build
|
|||
|
|
steps:
|
|||
|
|
- name: Deploy to GitHub Pages
|
|||
|
|
id: deployment
|
|||
|
|
uses: actions/deploy-pages@v4
|
|||
|
|
```
|
|||
|
|
|
|||
|
|
{{% /details %}}
|
|||
|
|
|
|||
|
|
|
|||
|
|
{{< callout >}}
|
|||
|
|
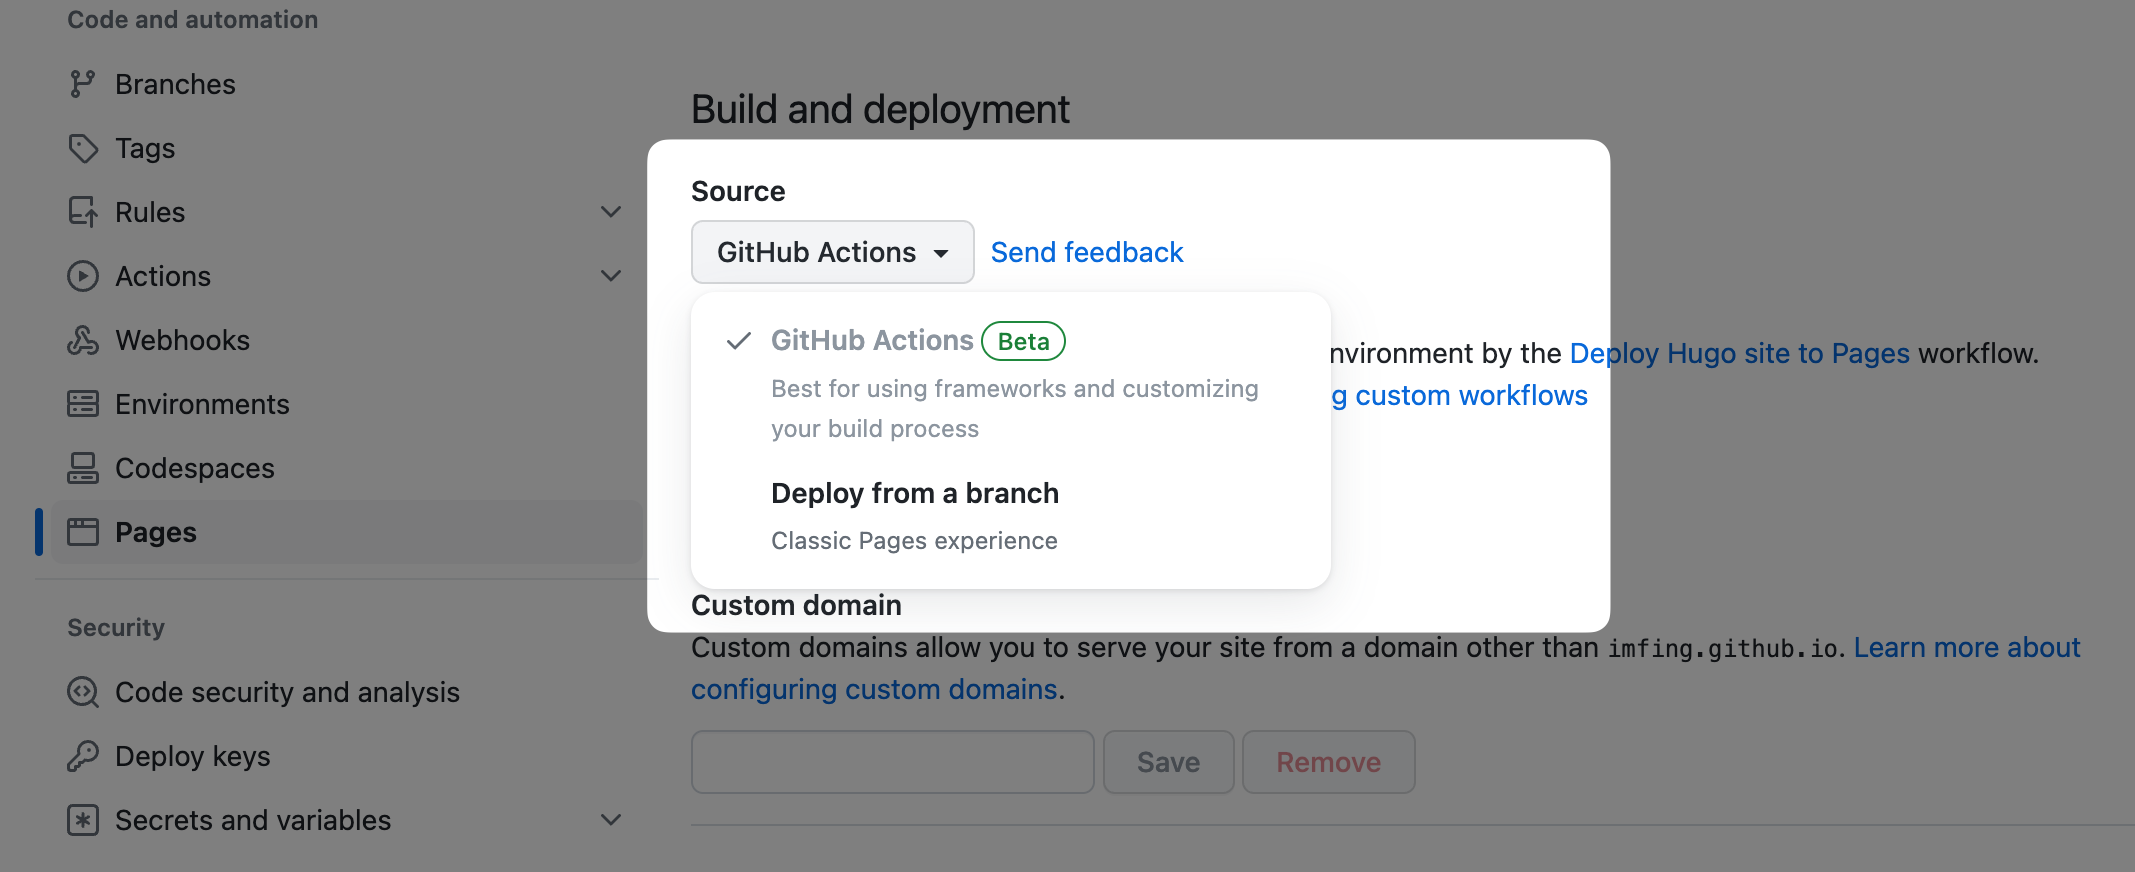
リポジトリ設定で、**Pages** > **Build and deployment** > **Source** を **GitHub Actions** に設定します:
|
|||
|
|
|
|||
|
|
{{< /callout >}}
|
|||
|
|
|
|||
|
|
デフォルトでは、上記のGitHub Actionsワークフロー `.github/workflows/pages.yaml` は、サイトが `https://<USERNAME>.github.io/<REPO>/` にデプロイされることを前提としています。
|
|||
|
|
|
|||
|
|
`https://<USERNAME>.github.io/` にデプロイする場合は、`--baseURL` を変更します:
|
|||
|
|
|
|||
|
|
```yaml {filename=".github/workflows/pages.yaml",linenos=table,linenostart=54,hl_lines=[4]}
|
|||
|
|
run: |
|
|||
|
|
hugo \
|
|||
|
|
--gc --minify \
|
|||
|
|
--baseURL "https://${{ github.repository_owner }}.github.io/"
|
|||
|
|
```
|
|||
|
|
|
|||
|
|
独自のドメインにデプロイする場合は、`--baseURL` の値を適宜変更してください。
|
|||
|
|
|
|||
|
|
|
|||
|
|
## Cloudflare Pages
|
|||
|
|
|
|||
|
|
1. サイトのソースコードをGitリポジトリ(例:GitHub)に配置します。
|
|||
|
|
2. [Cloudflareダッシュボード](https://dash.cloudflare.com/)にログインし、アカウントを選択します。
|
|||
|
|
3. アカウントホームで、**Workers & Pages** > **Create application** > **Pages** > **Connect to Git** を選択します。
|
|||
|
|
4. リポジトリを選択し、**Set up builds and deployments** セクションで以下の情報を提供します:
|
|||
|
|
|
|||
|
|
| 設定 | 値 |
|
|||
|
|
| ---------------- | ------------------- |
|
|||
|
|
| 本番ブランチ | `main` |
|
|||
|
|
| ビルドコマンド | `hugo --gc --minify` |
|
|||
|
|
| ビルドディレクトリ | `public` |
|
|||
|
|
|
|||
|
|
詳細については、以下を確認してください:
|
|||
|
|
- [Hugoサイトのデプロイ](https://developers.cloudflare.com/pages/framework-guides/deploy-a-hugo-site/#deploy-with-cloudflare-pages)。
|
|||
|
|
- [言語サポートとツール](https://developers.cloudflare.com/pages/platform/language-support-and-tools/)。
|
|||
|
|
|
|||
|
|
|
|||
|
|
## Netlify
|
|||
|
|
|
|||
|
|
1. コードをGitリポジトリ(GitHub、GitLabなど)にプッシュします。
|
|||
|
|
2. [プロジェクトをインポート](https://app.netlify.com/start)してNetlifyに追加します。
|
|||
|
|
3. [hextra-starter-template][hextra-starter-template]を使用していない場合、以下の設定を手動で行います:
|
|||
|
|
- ビルドコマンドを `hugo --gc --minify` に設定します。
|
|||
|
|
- 公開ディレクトリを `public` に指定します。
|
|||
|
|
- 環境変数 `HUGO_VERSION` を追加し、`0.138.0` に設定するか、`netlify.toml` ファイルに設定します。
|
|||
|
|
4. デプロイします!
|
|||
|
|
|
|||
|
|
詳細については、[NetlifyでのHugo](https://docs.netlify.com/integrations/frameworks/hugo/)を確認してください。
|
|||
|
|
|
|||
|
|
|
|||
|
|
## Vercel
|
|||
|
|
|
|||
|
|
1. コードをGitリポジトリ(GitHub、GitLabなど)にプッシュします。
|
|||
|
|
2. [Vercelダッシュボード](https://vercel.com/dashboard)に移動し、Hugoプロジェクトをインポートします。
|
|||
|
|
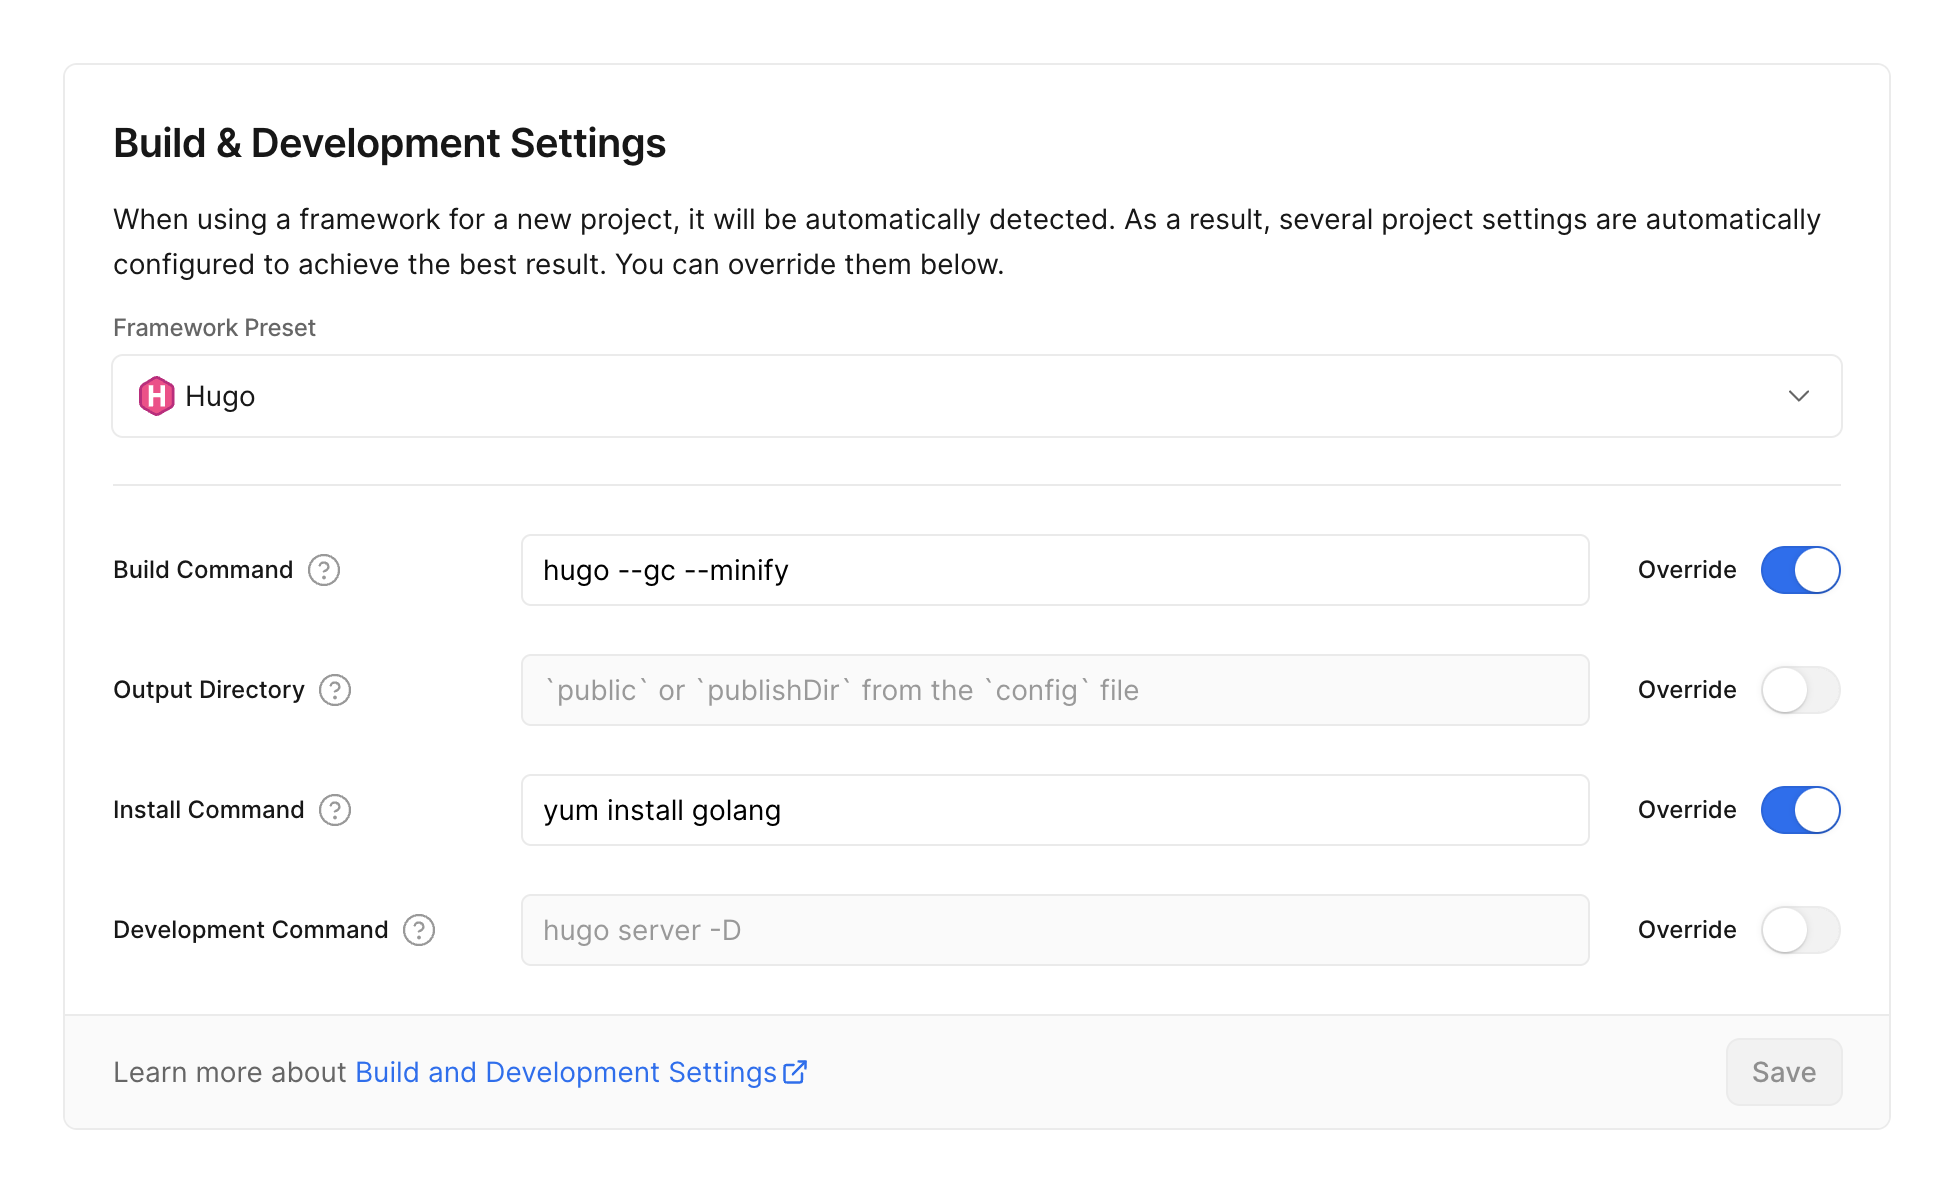
3. プロジェクトを設定し、フレームワークプリセットとしてHugoを選択します。
|
|||
|
|
4. ビルドコマンドとインストールコマンドを上書きします:
|
|||
|
|
1. ビルドコマンドを `hugo --gc --minify` に設定します。
|
|||
|
|
2. インストールコマンドを `yum install golang` に設定します。
|
|||
|
|
|
|||
|
|
|